Wednesday, August 27, 2014

ANALYSIS: How church attendance affects American attitudes toward Israel

ANALYSIS: How church attendance affects American attitudes toward Israel

Israel benefits from the fact that Americans remain in large part a religious people. But declining ‎religiosity bodes ill for the Jewish state.
What role does religion play in American attitudes towards Israel? An analysis by Frank Newport, the editor-in-‎chief of Gallup Inc., reviews 14 annual Gallup polls from 2001 to 2014, in which respondents answer the same ‎question: "In the Middle East situation, are your sympathies more with the Israelis or more with the ‎Palestinians?" The numbers offer insights different from what one might expect. ‎
The study starts with two basic facts: First, looking at the whole sample of about 14,000 American adults, 59 ‎percent answer that they have more sympathy for Israelis and 16 percent say they have more sympathy for ‎Palestinians, a ratio of almost 4-to-1. Second, Newport finds that "religious Americans are significantly more ‎likely than less religious Americans to be sympathetic to the Israelis," confirming what common sense already ‎tells us. ‎
That said, his numbers contain several noteworthy subtleties: ‎
  • A near-linear relationship exists between church attendance and outlook (see image 2, above): 66 percent of weekly or almost-‎weekly church-goers favor Israel, as do 58 percent of monthly and seldom church-goers and 46 percent ‎of never church-goers. Conversely, sympathy toward the Palestinians is also near-linear: 13 percent, 16 ‎percent, and 23 percent, respectively.
  • In both cases, any church attendance at all makes Christians more alike to each other vs. those who never ‎attend, a difference that has somewhat widened recently.
  • When one looks at religious group (see image 3, above), Jews, Mormons, and non-Catholic Christians are the most pro-Israel; ‎Catholics match the national average; other religious groups and the non-religious are the least pro-Israel. ‎
  • Political views and religiosity both influence Americans' view -- but as independent variables. ‎
  • Political views matter more than religiosity: "Nonreligious Republicans are more likely to sympathize with ‎Israelis than highly religious Democrats."‎
  • Church attendance has more of an impact on Republican views than on Democratic ones. ‎
  • Israel brings together two very politically dissimilar groups, church-attending Republican Christians and ‎Jewish Democrats.‎
Some reflections on these figures: ‎
1) Although religiosity helps explain the difference between the United States and Europe, politics has more ‎importance: that even irreligious Americans favor Israel 2-to-1 marks them as very different from their European ‎counterparts. ‎
2) Given the prominence of Jewish anti-Zionists in the academy, the media, and in Hollywood, the 93-to-2 ‎Jewish support for Israel comes as a surprise, suggesting that the most accomplished and articulate Jews tend to ‎be disproportionately hostile to Israel. Perhaps this is their way of fitting into the leftist institutions where they ‎work and hope to succeed?‎
3) One wishes the "Protestant" category provided further details on the various denominations. How much do ‎the mainline churches differ from the evangelical ones? Do the adherents of anti-Israel churches follow their ‎leadership in this regard? Are there important changes over time? Gallup should inform us about this in the ‎future. ‎
4) Muslims are lumped in with other non-Christians but have a unique profile. In Canada, whose Muslim ‎population differs substantially from the American Muslim community, pro-Israel Muslims number about 20 percent. I estimate ‎that pro-Israel American Muslims number half that percentage or less. Also of note: Religiosity among Muslims ‎has the opposite influence of religiosity among Christians, making them less pro-Israel. ‎
In conclusion, Israel benefits from the fact that Americans remain in large part a religious people. But declining ‎religiosity bodes ill for the Jewish state. ‎

Friday, August 22, 2014

How to change a Multisite primary domain

How to change a Multisite primary domain

  
If you want to change the primary domain of your WordPress multisite installation, there are 5 values to change. There is no need to perform a database dump. This is actually frowned upon, as WordPress stores serialized data in the database, and altering it can cause corruption. Here is a list of the 5 main tables and options that need to be changed (note that we’re assuming your table prefix is “wp_”. If you’re using a different table prefix, replace “wp_” in the following table names with your prefix):
  • wp_options: options named “siteurl” and “home”
  • wp_site
  • wp_sitemeta: the option named “siteurl”
  • wp_blogs: any entries in the “domains” column that have the old domain name
  • wp_#_options: Each sub-site will have sets of tables that correspond to the blog_id in the wp_blogs table. You need to go to the wp_#_options table, where # corresponds to the blog_id, and update the “siteurl” and “home” settings in that table.
WordPress has different rules for different fields. The wp_site and wp_blogs tables can NOT have http:// or a trailing slash at the end of the domain name, whereas in the wp_options table, it is required to have the http:// at the beginning. In the wp_sitemeta table it is required to have http:// at the beginning and a trailing slash at the end.
Also make sure to comment out any pre-defined constants in your wp-config.php file, as they will override settings in the database. Things such as:
define( 'WP_HOME', 'http://example.com' );
define( 'WP_SITEURL', 'http://example.com' );
After that, we have to manually tell our servers which domain is the new primary domain. We can make this change, and push it out in under a couple of seconds.
Note: In most cases you may/will need to update a entry in your WP-Config.php file. The code I would recommend taking a look at is the code snippet here:
define('WP_ALLOW_MULTISITE', true);
define( 'MULTISITE', true );
define( 'SUBDOMAIN_INSTALL', true );
$base = '/';
define( 'DOMAIN_CURRENT_SITE', 'mysite.wpengine.com' );
define( 'PATH_CURRENT_SITE', '/' );
define( 'SITE_ID_CURRENT_SITE', 1 );
define( 'BLOG_ID_CURRENT_SITE', 1 );
On the line that has “define(‘DOMAIN_CURRENT_SITE’,’mysite.wpengine.com’);”
You will replace “mysite.wpengine.com” with your domain. So for example:
define('WP_ALLOW_MULTISITE', true);
define( 'MULTISITE', true );
define( 'SUBDOMAIN_INSTALL', true );
$base = '/';
define( 'DOMAIN_CURRENT_SITE', 'mysite.com' );
define( 'PATH_CURRENT_SITE', '/' );
define( 'SITE_ID_CURRENT_SITE', 1 );
define( 'BLOG_ID_CURRENT_SITE', 1 );
If you need further assistance, please contact tech support.

Friday, August 15, 2014

UPDATE wp_users SET user_pass =md5('newpassword') WHERE user_login = 'yourusername');

UPDATE myprefix_users SET user_pass =md5('newpassword') WHERE user_login = 'yourusername');

UPDATE wp_users SET user_login = 'NewName' WHERE user_login = 'Admin';
UPDATE myprefix_users SET user_login = 'NewName' WHERE user_login = 'Admin';

POPULAR WORDPRESS SQL SCRIPTS: USER ADMINISTRATION

Here are some of the most common WordPress SQL user administration scripts that I run.

Backup! Backup! Backup!

First and foremost, before manipulating the database, ALWAYS back it up!
I am going to assume that you have access via a WordPress SQL Plugin or phpMyAdmin.
Remember, if you are like me and change the prefix, be sure to change the wp_ prefixes below to whatever your prefix is. I have added myprefix_ to help demonstrate where this change would be.

Change Default Administrator Name

12
UPDATE wp_users SET user_login = 'NewName' WHERE user_login = 'Admin';
UPDATE myprefix_users SET user_login = 'NewName' WHERE user_login = 'Admin';

Reset User Password

12
UPDATE wp_users SET user_pass =md5('newpassword') WHERE user_login = 'yourusername');
UPDATE myprefix_users SET user_pass =md5('newpassword') WHERE user_login = 'yourusername');
view rawuser-password.sql hosted with ❤ by GitHub

Delete Orphaned User Meta

12
DELETE FROM wp_usermeta WHERE user_id NOT IN (SELECT ID FROM wp_users)
DELETE FROM myprefix_usermeta WHERE user_id NOT IN (SELECT ID FROM myprefix_users)

Replace User Meta

12
UPDATE wp_usermeta SET meta_key = REPLACE (meta_key, 'old_name', 'new_name');
UPDATE myprefix_usermeta SET meta_key = REPLACE (meta_key, 'old_name', 'new_name');
view rawreplaceMetaKey.sql hosted with ❤ by GitHub

Add New Admin User

In the example below, I am using an ID of 2. Change this number to the next user available, or some safe high number.
1234567
INSERT INTO databasename.wp_users (ID, user_login, user_pass, user_nicename, user_email, user_url, user_registered, user_activation_key, user_status, display_name) VALUES ('2', 'admin_demo', MD5('demo_password'), 'Travis Smith', 'no-reply@wpsmith.net', 'http://wpsmith.net/', '2014-02-15 00:00:00', '', '0', 'Travis Smith');
INSERT INTO databasename.wp_usermeta (umeta_id, user_id, meta_key, meta_value) VALUES (NULL, '2', 'wp_capabilities', 'a:1:{s:13:"administrator";s:1:"1";}');
INSERT INTO databasename.wp_usermeta (umeta_id, user_id, meta_key, meta_value) VALUES (NULL, '2', 'wp_user_level', '10');
 
INSERT INTO databasename.myprefix_users (ID, user_login, user_pass, user_nicename, user_email, user_url, user_registered, user_activation_key, user_status, display_name) VALUES ('2', 'admin_demo', MD5('demo_password'), 'Travis Smith', 'no-reply@wpsmith.net', 'http://wpsmith.net/', '2014-02-15 00:00:00', '', '0', 'Travis Smith');
INSERT INTO databasename.myprefix_usermeta (umeta_id, user_id, meta_key, meta_value) VALUES (NULL, '2', 'myprefix_capabilities', 'a:1:{s:13:"administrator";s:1:"1";}');
INSERT INTO databasename.myprefix_usermeta (umeta_id, user_id, meta_key, meta_value) VALUES (NULL, '2', 'myprefix_user_level', '10');
view rawnew-admin.sql hosted with ❤ by GitHub

Delete Unknown Users

This will delete users not found in comments or as an author of a post. Do not use this script for community sites or sites with Subscribers.
1234567
DELETE FROM wp_users WHERE ID > 1 AND ID NOT IN (SELECT DISTINCT post_author FROM wp_posts) AND ID NOT IN (SELECT DISTINCT user_id FROM wp_comments);
DELETE FROM wp_usermeta WHERE user_id > 1 AND user_id NOT IN (SELECT DISTINCT post_author FROM wp_posts) AND user_id NOT IN (SELECT DISTINCT user_id FROM wp_comments);
DELETE FROM wp_links WHERE link_owner > 1 AND link_owner NOT IN (SELECT DISTINCT post_author FROM wp_posts) AND link_owner NOT IN (SELECT DISTINCT user_id FROM wp_comments);
 
DELETE FROM myprefix_users WHERE ID > 1 AND ID NOT IN (SELECT DISTINCT post_author FROM myprefix_posts) AND ID NOT IN (SELECT DISTINCT user_id FROM myprefix_comments);
DELETE FROM myprefix_usermeta WHERE user_id > 1 AND user_id NOT IN (SELECT DISTINCT post_author FROM myprefix_posts) AND user_id NOT IN (SELECT DISTINCT user_id FROM myprefix_comments);
DELETE FROM myprefix_links WHERE link_owner > 1 AND link_owner NOT IN (SELECT DISTINCT post_author FROM myprefix_posts) AND link_owner NOT IN (SELECT DISTINCT user_id FROM myprefix_comments);

Get All Admins

123
SELECT u.ID, u.user_login, u.user_nicename, u.user_email FROM wp_users u INNER JOIN wp_usermeta m ON m.user_id = u.ID WHERE m.meta_key = 'wp_capabilities' AND m.meta_value LIKE '%admin%' ORDER BY u.user_registered
 
SELECT u.ID, u.user_login, u.user_nicename, u.user_email FROM myprefix_users u INNER JOIN myprefix_usermeta m ON m.user_id = u.ID WHERE m.meta_key = 'myprefix_capabilities' AND m.meta_value LIKE '%admin%' ORDER BY u.user_registered
view rawget-admins.sql hosted with ❤ by GitHub
About Travis Smith
As a WordPress Enthusiast, Travis writes about his journey in WordPress trying to help other WordPress travelers and enthusiasts with tutorials, explanations, & demonstrations of the things he learns.

Change and Update WordPress URLS in Database When Site is Moved to new Host

Change and Update WordPress URLS in Database When Site is Moved to new Host

After migrating a WordPress site to a new URL either live or to a production or development server, the new URL strings in the mysql database need to be changed and updated in the various mysql database tables.
This method just uses the whole mysql database rather than a WordPress export/import from within, and is best suited for a straight swap. So you would copy all the WordPress files/folders to the new destination, set the correct ownership to those files = then do the database switcheroo.

WordPress Database Switcheroo

Do a mysql database export of the old database on the old server, create a new blank database on the new server, import the old data either in phpmyadmin or mysql directly in the command line.
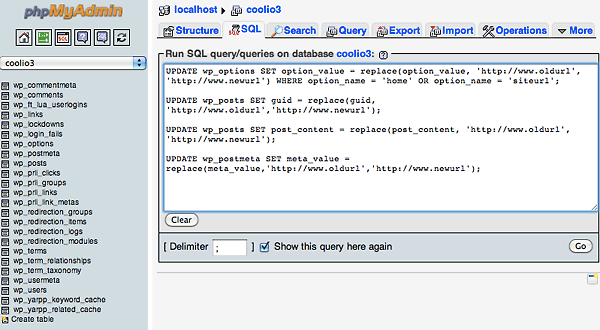
Make sure you have the new database selected, then run some sql updates and replacement commands on the tables notably, wp_options, wp_posts, wp_postmeta.
Use the code as below and swap in your old and new URLs, no trailing slashes. Also if necessary change the table prefix values where applicable (ie wp_ )
UPDATE wp_options SET option_value = replace(option_value, 'http://www.oldurl', 'http://www.newurl') WHERE option_name = 'home' OR option_name = 'siteurl';

UPDATE wp_posts SET guid = replace(guid, 'http://www.oldurl','http://www.newurl');

UPDATE wp_posts SET post_content = replace(post_content, 'http://www.oldurl', 'http://www.newurl');

UPDATE wp_postmeta SET meta_value = replace(meta_value,'http://www.oldurl','http://www.newurl');
mysql-updates-wordpress
or via command line:
username@[~/Desktop]: mysql -u root -p databasename
Enter password:
Reading table information for completion of table and column names
You can turn off this feature to get a quicker startup with -A

Welcome to the MySQL monitor. Commands end with ; or g.
Your MySQL connection id is 892
Server version: 5.5.13 MySQL Community Server (GPL)

Copyright (c) 2000, 2010, Oracle and/or its affiliates. All rights reserved.

Oracle is a registered trademark of Oracle Corporation and/or its
affiliates. Other names may be trademarks of their respective
owners.

Type 'help;' or 'h' for help. Type 'c' to clear the current input statement.

mysql> UPDATE wp_options SET option_value = replace(option_value, 'http://www.oldurl', 'http://www.newurl') WHERE option_name = 'home' OR option_name = 'siteurl';
Query OK, 0 rows affected (0.00 sec)
Rows matched: 2 Changed: 0 Warnings: 0

mysql> UPDATE wp_posts SET guid = replace(guid, 'http://www.oldurl','http://www.newurl');
Query OK, 0 rows affected (0.02 sec)
Rows matched: 964 Changed: 0 Warnings: 0

mysql> UPDATE wp_posts SET post_content = replace(post_content, 'http://www.oldurl', 'http://www.newurl');
Query OK, 0 rows affected (0.05 sec)
Rows matched: 964 Changed: 0 Warnings: 0

mysql> UPDATE wp_postmeta SET meta_value = replace(meta_value,'http://www.oldurl','http://www.newurl');g
Query OK, 0 rows affected (0.01 sec)
Rows matched: 686 Changed: 0 Warnings: 0
Finally update your WordPress config file to reflect the new database, “wp-config.php” should be in your web document root – change, databasename, username, password and host values:
define('DB_NAME', 'databasename');

/** MySQL database username */
define('DB_USER', 'username');

/** MySQL database password */
define('DB_PASSWORD', 'password');

/** MySQL hostname */
define('DB_HOST', 'localhost');
Now everything should link up perfectly.
djave has created a nice and easy script that takes the old and new URLs and hands you the sql code for the WordPress swap, nice!

Wednesday, August 13, 2014

How To Install Git on Ubuntu 12.04

How To Install Git on Ubuntu 12.04

What the Red Means

The lines that the user needs to enter or customize will be in red in this tutorial! The rest should mostly be copy-and-pastable.

About Git

Git is a distributed version control system released to the public in 2005. The program allows for non-linear development of projects, and can handle large amounts of data effectively by storing it on the local server. This tutorial will cover two ways to install Git.

How to Install Git with Apt-Get

Installing Git with apt-get is a quick and easy process. The program installs on the virtual private server with one command:
sudo apt-get install git-core
After it finishes downloading, you will have Git installed and ready to use.

How to Install Git from Source

If you are eager to download the most recent version of Git, it is generally a good idea to install it from the source.
Quickly run apt-get update to make sure that you download the most recent packages to your VPS.
sudo apt-get update
Prior to installing Git itself, download all of the required dependancies:
sudo apt-get install libcurl4-gnutls-dev libexpat1-dev gettext libz-dev libssl-dev build-essential
Once they are installed, you can download the latest version of Git from the google code page.
wget https://git-core.googlecode.com/files/git-1.8.1.2.tar.gz
After it downloads, untar the file and switch into that directory:
tar -zxf git-1.8.1.2.tar.gz
cd git-1.8.1.2
If you want to do a global install, install it once as yourself and once as root, using the sudo prefix:
make prefix=/usr/local all
sudo make prefix=/usr/local install
If you need to update Git in the future, you can use Git itself to do it.
git clone git://git.kernel.org/pub/scm/git/git.git

How to Setup Git

After Git is installed, whether from apt-get or from the source, you need to copy your username and email in the gitconfig file. You can access this file at ~/.gitconfig.
Opening it following a fresh Git install would reveal a completely blank page:
sudo nano ~/.gitconfig
You can use the follow commands to add in the required information.
git config --global user.name "NewUser"
git config --global user.email newuser@example.com
You can see all of your settings with this command:
git config --list
If you avoid putting in your username and email, git will later attempt to fill it in for you, and you may end up with a message like this:
[master 0d9d21d] initial project version
 Committer: root 
Your name and email address were configured automatically based
on your username and hostname. Please check that they are accurate.
You can suppress this message by setting them explicitly:

    git config --global user.name "Your Name"
    git config --global user.email you@example.com

After doing this, you may fix the identity used for this commit with:

    git commit --amend --reset-author

See More

This tutorial covered how to install Git on your virtual private server. Stay tuned for a second tutorial on Git Basics.
By Etel Sverdlov

Using MySQL Relational Databases on Ubuntu 12.04 LTS (Precise Pangolin)


Using MySQL Relational Databases on Ubuntu 12.04 LTS (Precise Pangolin)
Updated Tuesday, January 28th, 2014 by Alex Fornuto

MySQL is a popular database management system, used as the data storage provider for thousands of web and server applications. This guide will help beginners get started with MySQL on an Ubuntu 12.04 LTS (Precise Pangolin) Linux VPS. For purposes of this tutorial, we’ll assume you’ve followed the steps outlined in our getting started guide, that your system is up to date, and that you’ve logged into your Linode as root via SSH. If you’re performing these steps as a standard user with sudo privileges, remember to prepend “sudo” to the commands shown below.

Basic System Configuration
Make sure your /etc/hosts file contains sensible values. In the example file below, you would replace “12.34.56.78” with your Linode’s IP address, and “servername.example.com” with your Linode’s fully qualifed domain name (FQDN). It is advisable to use something unique and memorable for “servername” in this file.

/etc/hosts
127.0.0.1 localhost.localdomain localhost
12.34.56.78 servername.example.com servername
Next, make sure your Linode’s hostname is set to the short value you specified in /etc/hosts:

echo "servername" > /etc/hostname
hostname -F /etc/hostname
To make sure universe repositories are enabled, modify your /etc/apt/sources.list file to mirror the example file below.

/etc/apt/sources.list
## main & restricted repositories
deb http://us.archive.ubuntu.com/ubuntu/ precise main restricted
deb-src http://us.archive.ubuntu.com/ubuntu/ precise main restricted

deb http://security.ubuntu.com/ubuntu precise-security main restricted
deb-src http://security.ubuntu.com/ubuntu precise-security main restricted

## universe repositories
deb http://us.archive.ubuntu.com/ubuntu/ precise universe
deb-src http://us.archive.ubuntu.com/ubuntu/ precise universe
deb http://us.archive.ubuntu.com/ubuntu/ precise-updates universe
deb-src http://us.archive.ubuntu.com/ubuntu/ precise-updates universe

deb http://security.ubuntu.com/ubuntu precise-security universe
deb-src http://security.ubuntu.com/ubuntu precise-security universe
Installing MySQL
Make sure your package repositories and installed programs are up to date by issuing the following commands:

apt-get update
apt-get upgrade --show-upgraded
Begin by issuing the following command in your terminal:

apt-get install mysql-server
You will be prompted to set a password for the MySQL root user. Choose a strong password and keep it in a safe place for future reference.

Setting the MySQL root password in Ubuntu 12.04 LTS (Precise Pangolin).

The MySQL server package will be installed on your server, along with dependencies and client libraries. After installing MySQL, it’s recommended that you run mysql_secure_installation in order to help secure MySQL. While running mysql_secure_installation, you will be presented with the opportunity to change the MySQL root password, remove anonymous user accounts, disable root logins outside of localhost, and remove test databases. It is recommended that you answer yes to these options. If you are prompted to reload the privilege tables, select yes. Run the following command to execute the program:

mysql_secure_installation
After running mysql_secure_installation, MySQL is secure and ready to be configured.

Configuring MySQL
Issue the following command to restart MySQL after making configuration changes:

/etc/init.d/mysql restart
MySQL will bind to localhost (127.0.0.1) by default. Allowing unrestricted access to MySQL on a public IP not advised, but you may change the address it listens on by modifying the bind-address parameter in /etc/mysql/my.cnf. If you decide to bind MySQL to your public IP, you should implement firewall rules that only allow connections from specific IP addresses.

Using MySQL
The standard tool for interacting with MySQL is the mysql client program. To get started, issue the following command at your prompt:

mysql -u root -p
You will be prompted to enter the root MySQL user’s password. Enter the password you assigned when you installed MySQL, and you’ll be presented with the MySQL monitor display:

Welcome to the MySQL monitor.  Commands end with ; or \g.
Your MySQL connection id is 34
Server version: 5.1.41-3ubuntu12 (Ubuntu)

Type 'help;' or '\h' for help. Type '\c' to clear the current input statement.

mysql>
If you’ve forgotten your root password, use the package reconfiguration tool to change that password:

dpkg-reconfigure mysql-server-5.1
To generate a list of commands for the MySQL prompt type \h:

List of all MySQL commands:
Note that all text commands must be first on line and end with ';'
?         (\?) Synonym for `help'.
clear     (\c) Clear the current input statement.
connect   (\r) Reconnect to the server. Optional arguments are db and host.
delimiter (\d) Set statement delimiter.
edit      (\e) Edit command with $EDITOR.
ego       (\G) Send command to mysql server, display result vertically.
exit      (\q) Exit mysql. Same as quit.
go        (\g) Send command to mysql server.
help      (\h) Display this help.
nopager   (\n) Disable pager, print to stdout.
notee     (\t) Don't write into outfile.
pager     (\P) Set PAGER [to_pager]. Print the query results via PAGER.
print     (\p) Print current command.
prompt    (\R) Change your mysql prompt.
quit      (\q) Quit mysql.
rehash    (\#) Rebuild completion hash.
source    (\.) Execute an SQL script file. Takes a file name as an argument.
status    (\s) Get status information from the server.
system    (\!) Execute a system shell command.
tee       (\T) Set outfile [to_outfile]. Append everything into given outfile.
use       (\u) Use another database. Takes database name as argument.
charset   (\C) Switch to another charset. Might be needed for processing binlog with multi-byte charsets.
warnings  (\W) Show warnings after every statement.
nowarning (\w) Don't show warnings after every statement.

For server side help, type 'help contents'

mysql>
Let’s create a database and assign a user to it. Issue the following commands at the MySQL prompt:

CREATE DATABASE testdb;
CREATE USER 'testuser'@localhost IDENTIFIED BY 'changeme';
GRANT ALL PRIVILEGES ON testdb.* TO 'testuser'@localhost;
exit
Now let’s log back into the MySQL client as testuser and create a sample table called “customers.” Issue the following commands:

mysql -u testuser -p

USE testdb;
CREATE TABLE customers (customer_id INT NOT NULL AUTO_INCREMENT PRIMARY KEY, first_name TEXT, last_name TEXT);
This creates a table with a customer ID field of the type INT for integer (auto-incremented for new records and used as the primary key), as well as two fields for storing the customer’s name.

By default, access to databases will be limited to connections from localhost. To securely administer your databases from a remote location, please follow our guide for securely administering mysql with an SSH tunnel. It is not a good practice to run MySQL on your public IP address, unless you have a very good reason for doing so.

Tuning MySQL
MySQL Tuner is a useful tool that connects to a running instance of MySQL and provides configuration recommendations based on workload. Ideally, the MySQL instance should have been operating for at least 24 hours before running the tuner. The longer the instance has been running, the better advice MySQL Tuner will provide.

To install MySQL Tuner issue the following command:

sudo apt-get install mysqltuner
To run MySQL Tuner simply enter:

mysqltuner
Please note that this tool is designed to provide configuration suggestions and is an excellent starting point. It would be prudent to perform additional research for tuning configurations based on the application(s) utilizing MySQL.

More Information
You may wish to consult the following resources for additional information on this topic. While these are provided in the hope that they will be useful, please note that we cannot vouch for the accuracy or timeliness of externally hosted materials.

MySQL 5.1 Reference Manual
PHP MySQL Manual
Perl DBI examples for DBD::mysql
MySQLdb User’s Guide

Setting up Ubuntu 10.04 with Apache, memcached, ufw, MySQL, and Django 1.2 on Linode

Call me a sucker, but I love a good server setup as much as the next guy, I just have a little trouble setting it up sometimes. So I thought I’d walk through my process for setting up all this Django goodness on what is basically a LAMP setup (where “P” stands for Python!) with a few extras like memcached and ufw. We’ll get to a level of general security, but not prefect security.
Also, we’ll keep this well within the 360 megabytes allotted for the cheapest Linode. Before we get underway, just create a new Linode with Ubuntu 10.04 (32-bit), set your password. Alright, let’s get going!
Initial Setup
First thing to do is log in via the standard SSH on your Linode’s IP, port 22, and with rootas your username. We’ll change the login user away from root, but for now, this will do (plus we can skip all that sudo stuff). First, let’s update and upgrade the system.
apt-get update && apt-get upgrade
Awesome, you should be 100% up-to-date. Now its time to get to the fun part, let’s installsome of the software we’ll be using! Below are the commands to install Apache, MySQL, mod_wsgi and the python MySQL bindings, as well as memcached and ufw. If you have any prompts for passwords, you know what to do! Just remember what you set them as.
apt-get install build-essentials
apt-get install apache2 apache2.2-common apache2-mpm-worker apache2-threaded-dev libapache2-mod-wsgi python-dev python-setuptools
apt-get install mysql-server python-mysqldb
apt-get install memcached libmemcache-dev
apt-get install ufw
Really quickly, let’s get python-memcached installed (alternatively, if you need some raw speed, look up cmemcached or python-libmemcached). This will take a few steps…
# create and enter a temp dir in /home
cd /home && mkdir downloads && cd downloads
# get django 1.2 tar and untar it
wget -O pymem.tar.gz ftp://ftp.tummy.com/pub/python-memcached/python-memcached-1.47.tar.gz && tar -zxvf pymem.tar.gz
# enter the directory and install
cd python-memcached-1.47 && python setup.py install
Now its time for Django! Django 1.1.1 is a lot easier to install than Django 1.2.4:
# install django 1.1.1
apt-get install python-django
But let’s say we need Django 1.2.4: its gonna take a few more commands to make this happen. Watch out for that last command, anytime you use rm -r you can run into real trouble if you mistype (but we’re not production yet so no worries, right?).
# enter the downloads directory in /home
cd /home/downloads
# get django 1.2 tar and untar it
wget -O django124.tar.gz http://www.djangoproject.com/download/1.2.4/tarball/ && tar -zxvf django124.tar.gz
# enter the directory and install django 1.2
cd Django-1.2.4 && python setup.py install
# strictly optional delete of downloads directory, be careful with rm -r
cd /home && rm -r downloads
Actual Configuration
Let’s work backwards, we’ll start with the easy stuff and work our way to the more complicated things. Let’s get ufw and the SSH port out of the way first. Go ahead and pick a number between 1024-8000ish for the port we will eventually; I chose 5555 but youcan should use something else.
# turn on ufw
ufw enable
# log all activity (you'll be glad you have this later)
ufw logging on
# allow port 80 for tcp (web stuff)
ufw allow 80/tcp
# allow our ssh port
ufw allow 5555
# deny everything else
ufw default deny
# open the ssh config file and edit the port number from 22 to 5555, ctrl-x to exit
nano /etc/ssh/sshd_config
# restart ssh (don't forget to ssh with port 5555, not 22 from now on)
/etc/init.d/ssh reload
Now that you have ufw and SSH locked down, its time to move onto setting upmemcached (which is super easy). We’ll just run it as root and be done with it (you will need to repeat this command on each boot):
# replace 24 with however many megabytes of cache is appropriate
memcached -u root -d -m 24 -l 127.0.0.1 -p 11211
Alright, with that out of the way, let’s get MySQL nice and tight. The standard install of MySQL can suck up a lot of memory, so we’ll suggest a few ways to lighten the load:
# open mysql conf and set these settings:
#    key_buffer = 16k
#    max_allowed_packet = 1M
#    thread_stack = 64K
nano /etc/mysql/my.cnf
# restart mysql
/etc/init.d/mysql restart
Now let’s get a new user setup and leave behind this root nonsense for safety’s sake. Your username is going to be bobby for this example. Replace bobby everywhere if you want something different.
# create bobby, you'll be asked to set the password and such
adduser bobby
# edit the ssh file and add the line: AllowUsers bobby
# ctrl-x to exit and save
nano /etc/ssh/sshd_config
# restart ssh
/etc/init.d/ssh reload
# log out and login as bobby from now on!
It’s time for the nitty gritty stuff: setting up Apache and mod_wsgi with Django for the domain you own called examplesite.com (creative, I know). We need to make apublic_html folder in bobby’s home folder and place a folder called examplesite.com (as well as a few more). We’ll do that first.
cd /home/bobby/
mkdir public_html
mkdir public_html/examplesite.com
mkdir public_html/examplesite.com/logs
mkdir public_html/examplesite.com/private
Right now you should place your Django project into the public_html/examplesite.comfolder. For example, if the project is housed in demoproject (eg: demoproject/manage.py, demoproject/urls.py, etc.) you’ll want it placed ALApublic_html/examplesite.com/demoproject. Time to get the Apache config files up and running. Here we go!
cd /home/bobby/public_html/examplesite.com/demoproject/
mkdir apache
nano apache/demoproject.wsgi
First, in the demoproject.wsgi file you should paste and save:
import os, sys
 
apache_configuration= os.path.dirname(__file__)
project = os.path.dirname(apache_configuration)
workspace = os.path.dirname(project)
sys.path.append(workspace)
 
sys.path.append('/usr/lib/python2.5/site-packages/django/')
sys.path.append('/home/bobby/public_html/examplesite.com/demoproject')
 
os.environ['DJANGO_SETTINGS_MODULE'] = 'demoproject.settings'
import django.core.handlers.wsgi
application = django.core.handlers.wsgi.WSGIHandler()
We’re so close, let’s get the other Apache files setup. Oh, and don’t worry about thatwww-data thing just yet, we’ll get to that in a second.
# give the www-data user/group permission on public_html
sudo chown -R www-data:www-data /home/bobby/public_html
sudo nano /etc/apache2/sites-available/examplesite.com
Place the text below in the examplesite.com config file (remember the www-data part from the last command?). You can modify the threads and processes numbers to suit your moods and load.
    #Basic setup
    ServerAdmin your@email.com
    ServerName www.examplesite.com
    ServerAlias examplesite.com
 
        Order deny,allow
        Allow from all
 
    LogLevel warn
    ErrorLog  /home/bobby/public_html/examplesite.com/logs/apache_error.log
    CustomLog /home/bobby/public_html/examplesite.com/logs/apache_access.log combined
 
    WSGIDaemonProcess examplesite.com user=www-data group=www-data threads=20 processes=2
    WSGIProcessGroup examplesite.com
 
    WSGIScriptAlias / /home/bobby/public_html/examplesite.com/demoproject/apache/demoproject.wsgi
A few more final things:
sudo a2ensite examplesite.com
sudo /etc/init.d/apache2 restart
Time to admire your handiwork.
Congrats! You’re all set up and ready to roll! Nothing can stop you now! Here’s a neat command to measure your memory usage as mine rarely gets over 160mb. This gives lots of room for growth as you can always increase the memcached size, MySQL settings, and Apache/mod_wsgi instances/threads.
# measure your memory usage in kb
ps aux | awk '{print $3"\t"$6"\t"$11;sum+=$6;cpu+=$3} END {print "Total RSS", sum, "\nTotal CPU", cpu}'
Also, under Ubuntu 10.04 (Lucid), Python’s site-packages is now called dist-packages. Just a FYI.